반응형
Mediapipe 라이브러리를 사용하기 위한 준비는 앞서 포스트를 참고하시면 됩니다.
(HandTracking을 위한 모듈을 생성하는 부분)
[OpenCV] Mediapipe를 사용하여 구글 T-rex게임 제어하기
대학생때 Toy Project로 진행하였던, 손가락 위치에 따른 Trex게임 제어를 포스팅 하겠습니다. 해당 프로젝트는 Mediapipe 라이브러리를 사용하여 손을 인식 시키고, 손가락 위치에 따른 키보드 제어를
junn97.com
Volume_circle.py
import math
import cv2
import cvzone
import numpy as np
import HandTrackingModule as htm
# from cvzone.HandTrackingModule import HandDetector
from ctypes import cast, POINTER
from comtypes import CLSCTX_ALL
from pycaw.pycaw import AudioUtilities, IAudioEndpointVolume
cap = cv2.VideoCapture(0)
cap.set(3, 800)
cap.set(4, 600)
detector = htm.handDetector(detectionCon=0.75, maxHands=2)
devices = AudioUtilities.GetSpeakers()
interface = devices.Activate(
IAudioEndpointVolume._iid_, CLSCTX_ALL, None)
volume = cast(interface, POINTER(IAudioEndpointVolume))
volRange = volume.GetVolumeRange()
minVol = volRange[0]
maxVol = volRange[1]
while True:
success, img = cap.read()
img = detector.findHands(img)
# img = cv2.flip(img, 1)
cv2.circle(img, (400, 300), 100, (0, 0, 0), 3)
cv2.circle(img, (400, 300), 95, (255, 255, 255), 3)
cv2.circle(img, (400, 300), 40, (0, 0, 0), 3)
lmList = detector.findPosition(img, draw=False)
if len(lmList) != 0:
x1, y1 = lmList[4][1], lmList[4][2]
x2, y2 = lmList[8][1], lmList[8][2]
x3, y3 = lmList[12][1], lmList[12][2]
x4, y4 = lmList[16][1], lmList[16][2]
x5, y5 = lmList[20][1], lmList[20][2]
p1, p2 = lmList[9][1], lmList[9][2]
cx, cy = (x1+x2+x3+x4+x5)//5, (y1+y2+y3+y4+y5)//5
# h1 = math.hypot(p1 - x1, p2 - y1)
h2 = math.hypot(p1 - x2, p2 - y2)
# h3 = math.hypot(p1 - x3, p2 - y3)
# h4 = math.hypot(p1 - x4, p2 - x4)
# h5 = math.hypot(x5 - p1, y5 - p2)
# c1 = round(math.acos(p1-x1/h1) * (180 / math.pi))
c2 = round(math.acos((p1-x2)/h2) * (180 / math.pi))
# c3 = round(math.acos(p1-x3/h3) * (180 / math.pi))
# c4 = round(math.acos(p1 - x4/h4) * (180 / math.pi))
# c5 = round(math.acos(x5/h5) * (180 / math.pi))
# cc = (c1 + c2 + c3 + c4 + c5) // 5
print(c2)
# print(h1, x2, y2)
# cv2.circle(img, (x1, y1), 15, (255, 255, 255), cv2.FILLED)
# cv2.circle(img, (x2, y2), 15, (255, 255, 255), cv2.FILLED)
# cv2.circle(img, (x3, y3), 15, (255, 255, 255), cv2.FILLED)
# cv2.circle(img, (x4, y4), 15, (255, 255, 255), cv2.FILLED)
# cv2.circle(img, (x5, y5), 15, (255, 255, 255), cv2.FILLED)
# cv2.line(img, (x1, y1), (x2, y2), (0, 0, 0), 3)
# cv2.line(img, (x2, y2), (x3, y3), (0, 0, 0), 3)
# cv2.line(img, (x3, y3), (x4, y4), (0, 0, 0), 3)
# cv2.line(img, (x4, y4), (x5, y5), (0, 0, 0), 3)
# cv2.line(img, (x5, y5), (x1, y1), (0, 0, 0), 3)
cv2.circle(img, (cx, cy), 15, (255, 0, 0), cv2.FILLED)
if c2 > 170:
cv2.circle(img, (cx, cy), 15, (0, 255, 0), cv2.FILLED)
elif c2 < 90:
cv2.circle(img, (cx, cy), 15, (0, 0, 255), cv2.FILLED)
else:
cv2.circle(img, (cx, cy), 15, (255, 0, 0), cv2.FILLED)
vol = np.interp(c2, [65, 180], [maxVol, minVol]) # 손의 범위를, 볼륨 범위로 변경해주는 것.
# print(int(c2), vol)
volume.SetMasterVolumeLevel(vol, None)
# if 350 < x2 < 450 and 250 < y2 < 350:
# cv2.circle(img, (x2, y2), 15, (0, 255, 0), cv2.FILLED)
# cvzone.cornerRect(img, (350, 250, 100, 100), 20, rt=0)
cv2.imshow("Image", img)
if cv2.waitKey(1) & 0xFF == 27:
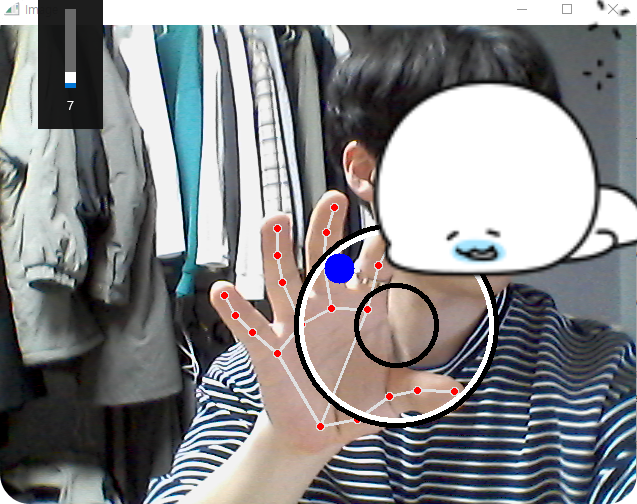
break각 손가락의 중심점과 LandMark의 위치에 따른 거리에 비례하여 음향을 조절 할 수 있습니다.
결과

반응형
'💻 개발(Dev) > Python' 카테고리의 다른 글
| [Python] 아두이노 온습도센서(DHT11) 측정 값 그래프로 출력하기 (0) | 2023.02.18 |
|---|---|
| [OpenCV] Mediapipe를 사용하여 구글 T-rex게임 제어하기 (0) | 2023.02.11 |